In this tutorial, we will be looking into how to set up and add unit tests to React components using Jest and Enzyme. Jest and Enzyme are different tools, both together to provide flexible and creative testing abilities. Before we start to write the test, we need to set up the react application. Here I have used create-react-app for setting up theReact application.
By running following command we can install create-react-app,
$ npm install create-react-app
Now we can create the react app using the following command,
$ npm init react-app my-react-app
Now we can change the directory to the new React app directory created and start the development server like following,
$ cd my-react-app/
$ npm start
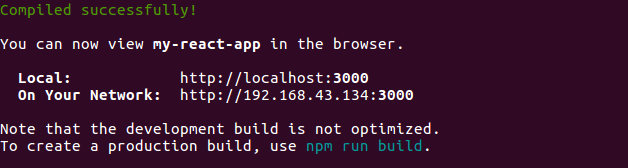
Now you can see the confirmation message of a compilation of app and port number of React application, using this port number we can access the react application.
Now you can open the React application on your favorite text editor and change the scr/App.js component based on your needs. For this tutorial, I have made an application that lists the employee’s information.
What is Jest?
 Jest is an open-source Javascript testing framework created by Facebook. It offers the best integration with ReactJS including a command-line tool for test execution.
Jest is distributed as an NPM package, you can install it in any JavaScript project. It is one of the most popular test runners these days and an ideal choice for Create React App.
Jest also offers “snapshot testing” to verify the component rendering result.
What is Enzyme?
Enzyme isn’t a testing framework, but rather a testing utility for React that makes it easier to test the outputs of components, abstracting the rendering of components.
Much like JQuery, which is used on the DOM, Enzyme lets you manipulate, traverse, and in some ways simulate runtime given the output. In short, it can really help you render components, find elements and interact with them.
Setting up Jest and Enzyme
Add the following npm packages into the package.json file to set up the jest and enzyme.
"babel-jest": "^25.1.0",
"jest": "^25.1.0",
"jest-cli": "^25.1.0",
"enzyme": "^3.11.0"
"enzyme-adapter-react-16": "^1.15.2"
Now you can run npm install to install the packages in our application. After installing now we need to update package.json file like following,
...
"scripts": {
   "start": "react-scripts start",
   "build": "react-scripts build",
   "test": "jest"
},
…
Now we can create a __test__ folder under src directory to write all the testings.
Also Read: Learn to Build an Application with ReactJS in 30 Minutes
Snapshot Testing with Jest
Snapshot tests are a very useful tool whenever you want to make sure your UI doesn’t go unexpectedly. Jest takes the component for testing, renders it, and then takes a snapshot of what the component should look like.
When you run the tests for the first time, notice that a new snapshot file is created inside a __snapshots__ directory. Since here the test file is named Title.test.js, the snapshot file is appropriately named Title.test.js.snap that looks like this:
Consider the following Title.js component.
import React, { Component } from 'react';
export default class Title extends Component {
 render() {
 return (
  <h1 style={{textAlign: 'center'}}>{this.props.text}</h1>
  )
 }
}
Title.test.js
import React from 'react';
import renderer from 'react-test-renderer';
import Title from '../Title';
describe("Title Component", () => {
 it('should render the component correctly', () => {
  const tree = renderer.create(<Title text="Employees List" />).toJSON();
  expect(tree).toMatchSnapshot();
 });
});
When we run the test first time, it will create the snapshot file (Title.test.js.snap) under __snapshots__ directory with the following code.
/exports[`Title Component should render the component correctly 1`] = `
<h1
 style={
  Object {
  "textAlign": "center",
  }
 }
>
 Employees List
</h1>
`;
When continuing to work on your project, every time you run your test suite, Jest will do the process over again and compare the old snapshot to a new one. If the snapshots do not match, then it shows an error message in the terminal and highlights the parts that do not match. For example, now I will change the Title.test.js component like following,
import React from 'react';
import renderer from 'react-test-renderer';
import Title from '../Title';
describe("Title Component", () => {
 it('should render the component correctly', () => {
  const tree = renderer.create(<Title text="Employee Information" />).toJSON();
  expect(tree).toMatchSnapshot();
 });
});
Then we run the test it will return the error like following,
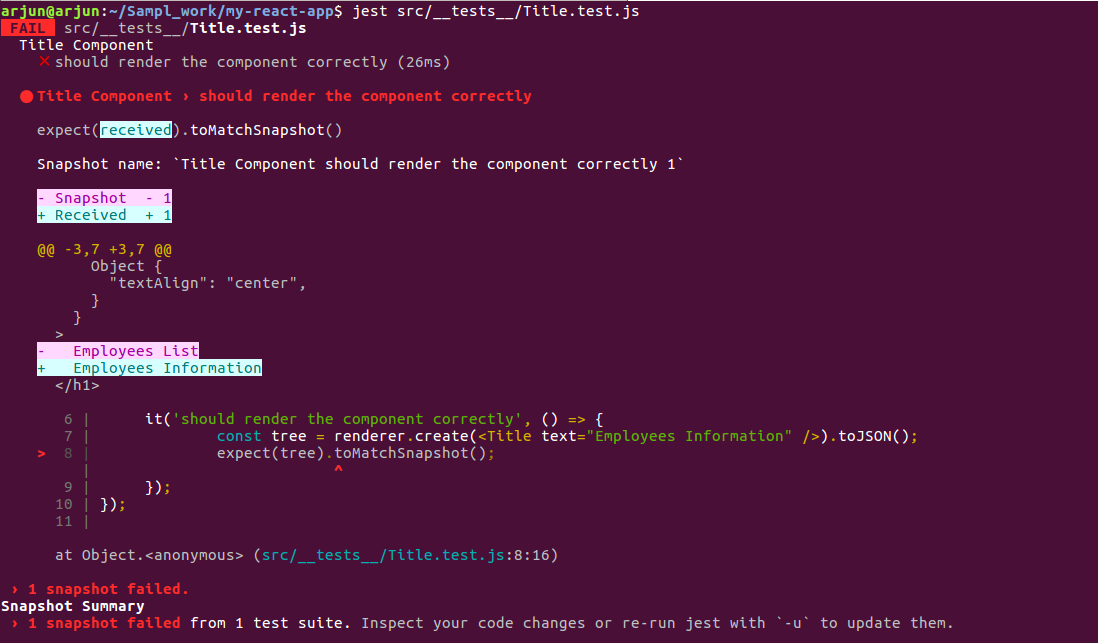
Now, we have updated the title text, it’s reasonable to expect changes in the snapshot for this component. Our snapshot test case is failing because the snapshot for our updated component no longer matches the snapshot for this test case.
To resolve this, we will need to update our snapshot. You can run Jest with a flag that will tell it to re-generate snapshots:
$ jest src/__tests__/Title.test.js –updateSnapshot
It will update the snapshot file and run the snapshot test successfully.

Testing Component Render with Enzyme API
To test the component rendering and get the specific element of the component we need the enzyme API. The following three different methods we can render the React component,
- Shallow rendering
- Full rendering
- Static rendering
Now we can configure the enzyme adapter to use the enzyme APIs, create a file setupTests.js under src directory and add the following code,
import Enzyme from 'enzyme'
import Adapter from 'enzyme-adapter-react-16'
Enzyme.configure({ adapter: new Adapter() })
Now you can create jest.config.js file under the root directory and add the following line,
module.exports = {
  "moduleNameMapper": {
    "\\.(css|less|scss)$": "identity-obj-proxy"
  },
  "setupFilesAfterEnv": ["/src/setupTests.js"]
}
Related: 10 Best Tools for React Developers in 2020
Shallow rendering
When writing unit tests for React, shallow rendering can be helpful. We can use the shallow rendering to an initial state of component testing. It renders a component “one level deep” and enables the inspection of the component’s contents as well as the simulation of user interaction. Shallow render does not worry about the behavior of child components, which are not instantiated or rendered. Shallow rendering does not require the DOM.
For example, consider the App.js component on my example,
import React from 'react';
import EmployeeList from './EmployeeList';
import Title from './Title';
function App() {
  const data = [
   { id: 'INC001', name: 'John', role: 'CEO' },
   { id: 'INC002', name: 'Ragavi', role: 'Director' },
   { id: 'INC004', name: 'Peter', role: 'Junior Engineer' }
 ];
const columns = [
 { Header: 'Employee ID', accessor: 'id' },
 { Header: 'Name', accessor: 'name' },
 { Header: 'Designation', accessor: 'role' }
];
return (
 <div>
   <Title text="Employees List" />
   <EmployeeList data={data} columns={columns} />
 </div>
 );
}
export default App;
Now we can assert the component like following (App.test.js)
import React from 'react';
import { shallow } from 'enzyme';
import App from '../App';
import Title from '../Title';
let wrapper;
beforeEach(() => {
  wrapper = shallow(<App />);
});
describe("App Component", () => {
  it('It should render Title Component Once', () => {
    expect(wrapper.find(Title)).toHaveLength(1);
  });
 it('should have one <h1> tag', () => {
   expect(wrapper.find('h1')).toHaveLength(1);
 });
});
Now we can open the terminal and navigate to the project root directory and run the App.test.js file,
$ jest src/__tests__/App.test.js
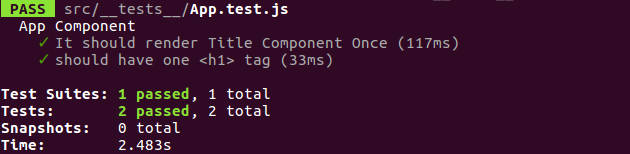
Now we can see the result like below,

We can see 1 test has passed, which is to check the rendering of <Title> component, because <Title> is a child of <App> component. But the check to render of <h1> failed because it is a child of Title component. The shallow method does not render the <h1> element inside <Title> component, which is why this test fails. As earlier the shallow is not worried about the child components’ behavior.
Full Rendering (mount)
The full rendering is the only way to test the React component lifecycle methods (componentDidMount, etc). It will render the full DOM including the child components of the parent component of running the tests.
Full DOM rendering requires that a full DOM API be available at the global scope. This means that it must be run in an environment that at least “looks like” a browser environment. If you do not want to run your tests inside of a browser, the recommended approach to using mount is to depend on a library called jsdom which is essentially a headless browser implemented completely in JS.
Now we can change the App.test.js component like following and running the test it will pass all the test cases.
import React from 'react';
import { mount } from 'enzyme';
import App from '../App';
import Title from '../Title';
let wrapper;
beforeEach(() => {
  wrapper = mount(<App />);
});
describe("App Component", () => {
  it('It should render Title Component Once', () => {
    expect(wrapper.find(Title)).toHaveLength(1);
  });
  it('should have one <h1> tag', () => {
    expect(wrapper.find('h1')).toHaveLength(1);
  });
});
Now the 2 test cases are passed because the mount renders all the child components. Unlike shallow or static rendering, full rendering actually mounts the component in the DOM, which means that tests can affect each other if they are all using the same DOM. Keep that in mind while writing your tests and, if necessary, use unmount() or something similar to cleanup.
Static Rendering
Enzyme’s render function is used to render React components to static HTML and analyze the resulting HTML structure. It only calls render but renders all the children. The render function behaves the same as shallow and mount but render does not have access to React lifecycle methods.
Now we can change the App.test.js like following,
import React from 'react';
import { render } from 'enzyme';
import App from '../App';
import Title from '../Title';
let wrapper;
beforeEach(() => {
  wrapper = render(<App />);
});
describe("App Component", () => {
  it('should have one <h1> tag', () => {
    expect(wrapper.find('h1')).toHaveLength(1);
  });
});
Now we can run the test, then we will see the result like below,

We can see the test has passed because the render method only returns the plain HTML content.
We have looked at how to set up the jest in react application, writing the snapshot testing and integrating the Enzyme for unit testing the React component. You can get all the code from Github to run the test locally.
Was this helpful? Share with your ReactJS folks out there! Feel free to comment on your doubts and suggestions in the comment section.
Looking for highly skilled ReactJS developers? Hire React developers at Agira. Get started with your dream project right with our React JS expertise. Get in touch with us today!