In this blog, we will be learning how to create simple crud APIs in Express JS ( Node JS Framework ).
The Mean stack is used to describe development using MongoDB, Express.js, Angular.jS, and Node.js. Now, I will show you how to use Express.js, Node.js, and MongoDB.js. We will be creating a simple Node application that will allow users to input data they want to store in a MongoDB database, also showing all other data entered.
Install using Node, Express, MongoDB
Express
Express.js is a web application framework. It simplifies the server creation process that is already available in Node. Node allows you to use JavaScript as your server-side language.
We need to install express via npm
npm install express --save
MongoDB
MongoDB is an open-source database. Mongoose is a client API for node.js, making it easy to access our database from our Express application.
We need to install MongoDB via npm.
npm install mongodb --save
Create a project in Express
For creating a project, we run the below command in the command prompt where you want to create.
npm init
Project Structure
MongoCrud- Package name
controller
– product.controller.js
Models
– product.model.js
– routes
– product.route.js
– node_modules
– app.js
– package.json
Create a Database Connectivity File
Here we can create a file in mongoose schemas and MongoDB connection. You should connect to MongoDB through the Mongo client’s connect method.
const MongoClient = require('mongodb').MongoClient
MongoClient.connect('mongodb-connection-string', (err, client) => {
})
app.js
const express = require('express');
const bodyParser = require('body-parser');
const mongoose = require('mongoose');
mongoose.connect("mongodb://localhost:27017/testdb", {
keepAlive: true,
keepAliveInitialDelay: 300000,
socketTimeoutMS: 2000000,
useNewUrlParser: true,
useUnifiedTopology: true,
useCreateIndex: true,
}).then(data=>console.log('db connected')).catch(err=>console.log('db error', err));
const product = require('./routes/product.route');
const app = express();
app.use(express.json());
app.use('/products', product);
app.use(bodyParser.json());
app.use(bodyParser.urlencoded({ extended: true }));
let port = 3000;
app.listen(port, () => {
console.log('Running on port numner ' + port);
});
Create a Model Schema
Everything in Mongoose starts with a Schema. Each schema maps to a MongoDB collection and defines the type of the documents within that collection.
product.model.js
const mongoose = require('mongoose');
const Schema = mongoose.Schema;
require('mongoose-type-email');
let studentSchema = new Schema({
id: { type: Number, required: true, max: 100 },
firstName: { type: String, required: true, max: 100 },
lastName: { type: String, required: true, max: 100 },
email: { type: mongoose.SchemaTypes.Email, required: true },
amount: [{ type: Number, required: true, max: 100 }]
});
// Export the model
module.exports = mongoose.model("students", studentSchema, "students");
Create a Controller
We created CRUD for communicating with the server. Now we will apply the real logic to the route and controller.
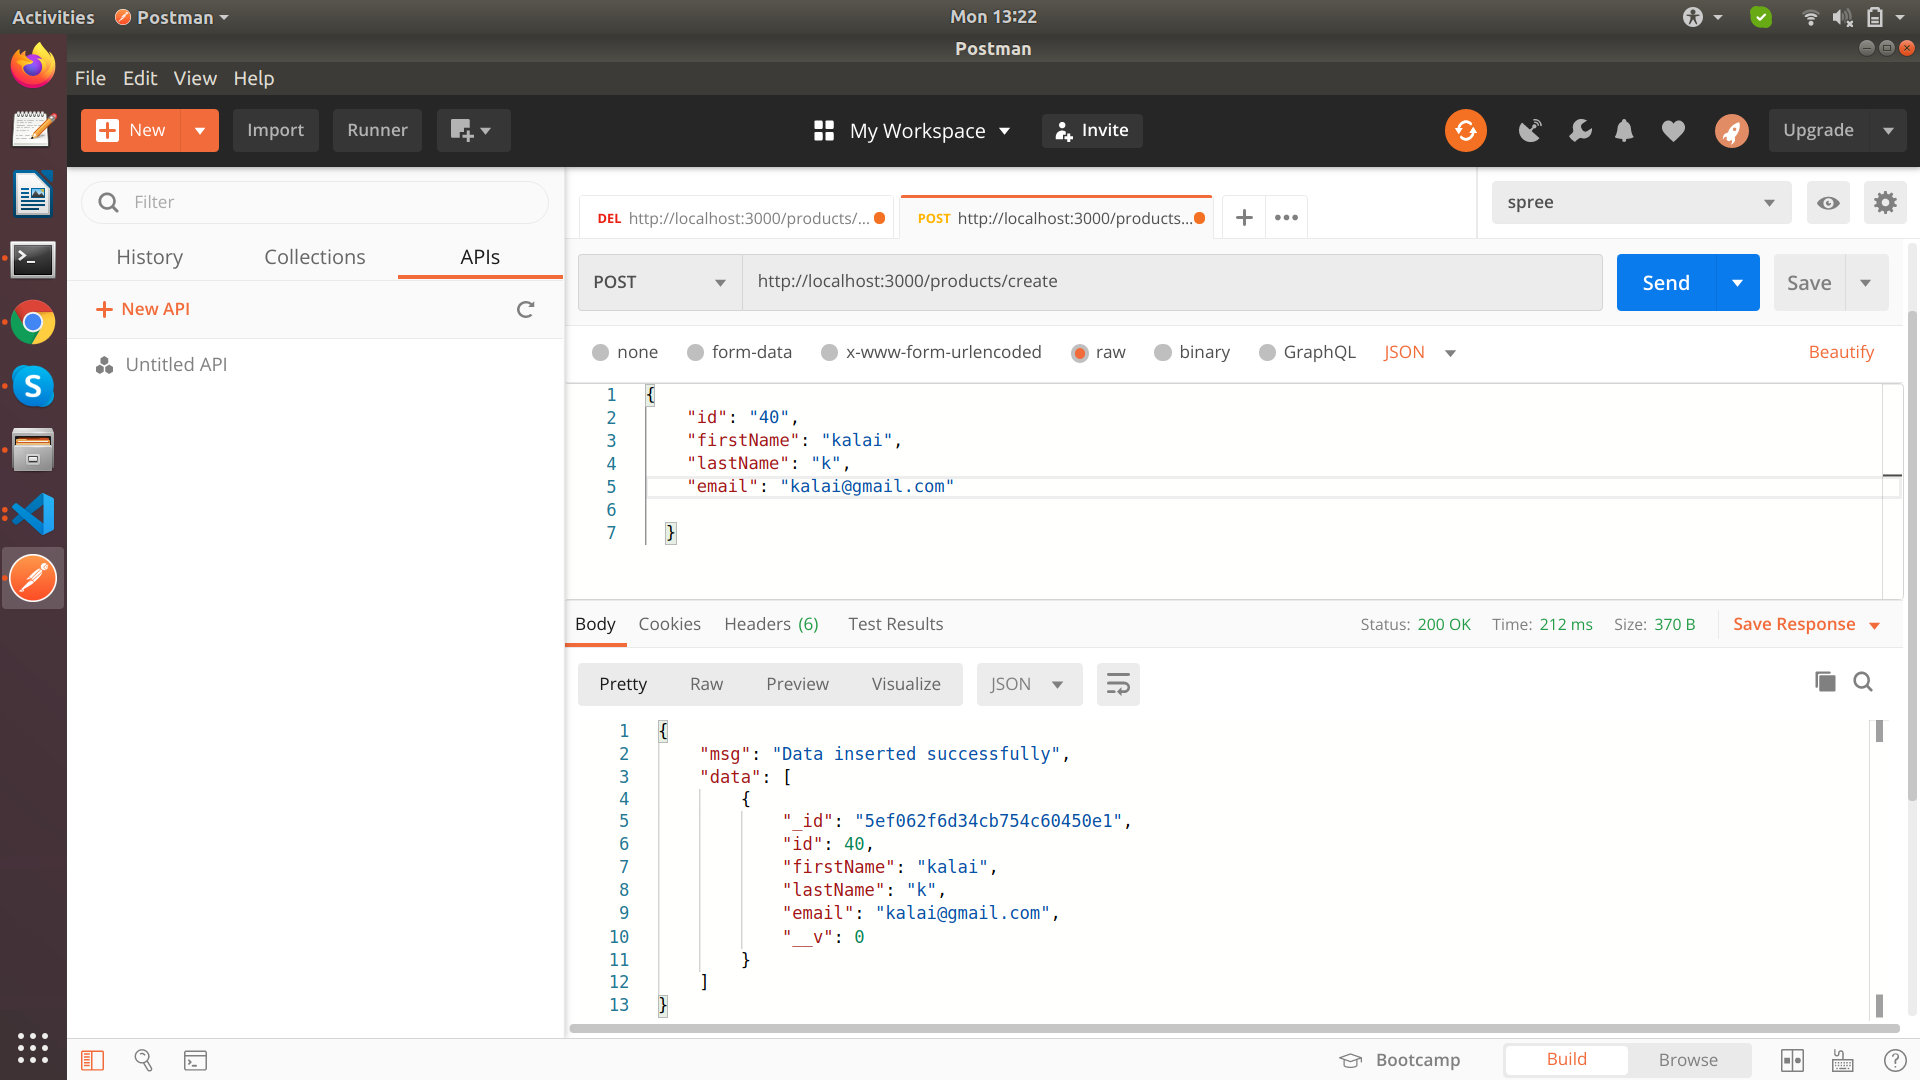
Create a new student (POST request)
const Student = require('../models/product.model');
//Simple Testing
exports.test = function (req, res) {
 res.send('Hi guys!');
};
exports.student_create = function (req, res, next) {
 var product = [{
   id: req.body.id,
   firstName: req.body.firstName,
   lastName: req.body.lastName,
   email: req.body.email,
 }]
 Student.create(product, ((err, result) => {
   console.log('result', result);
   if (!err) {
     res.send({
       msg: "Data inserted successfully"
       data: result
    })
     return;
   }
In the route, we don’t have to pass anything, Here we can upload the route file.
Product.route.js
const express = require('express');
const router = express.Router();
// call for controller
const product_controller = require('../controller/product.controller');
// test url
router.get('/test', product_controller.test);
router.post('/create', product_controller.student_create);
module.exports = router;
   res.send({
     msg: "error",
   })
 }));
}
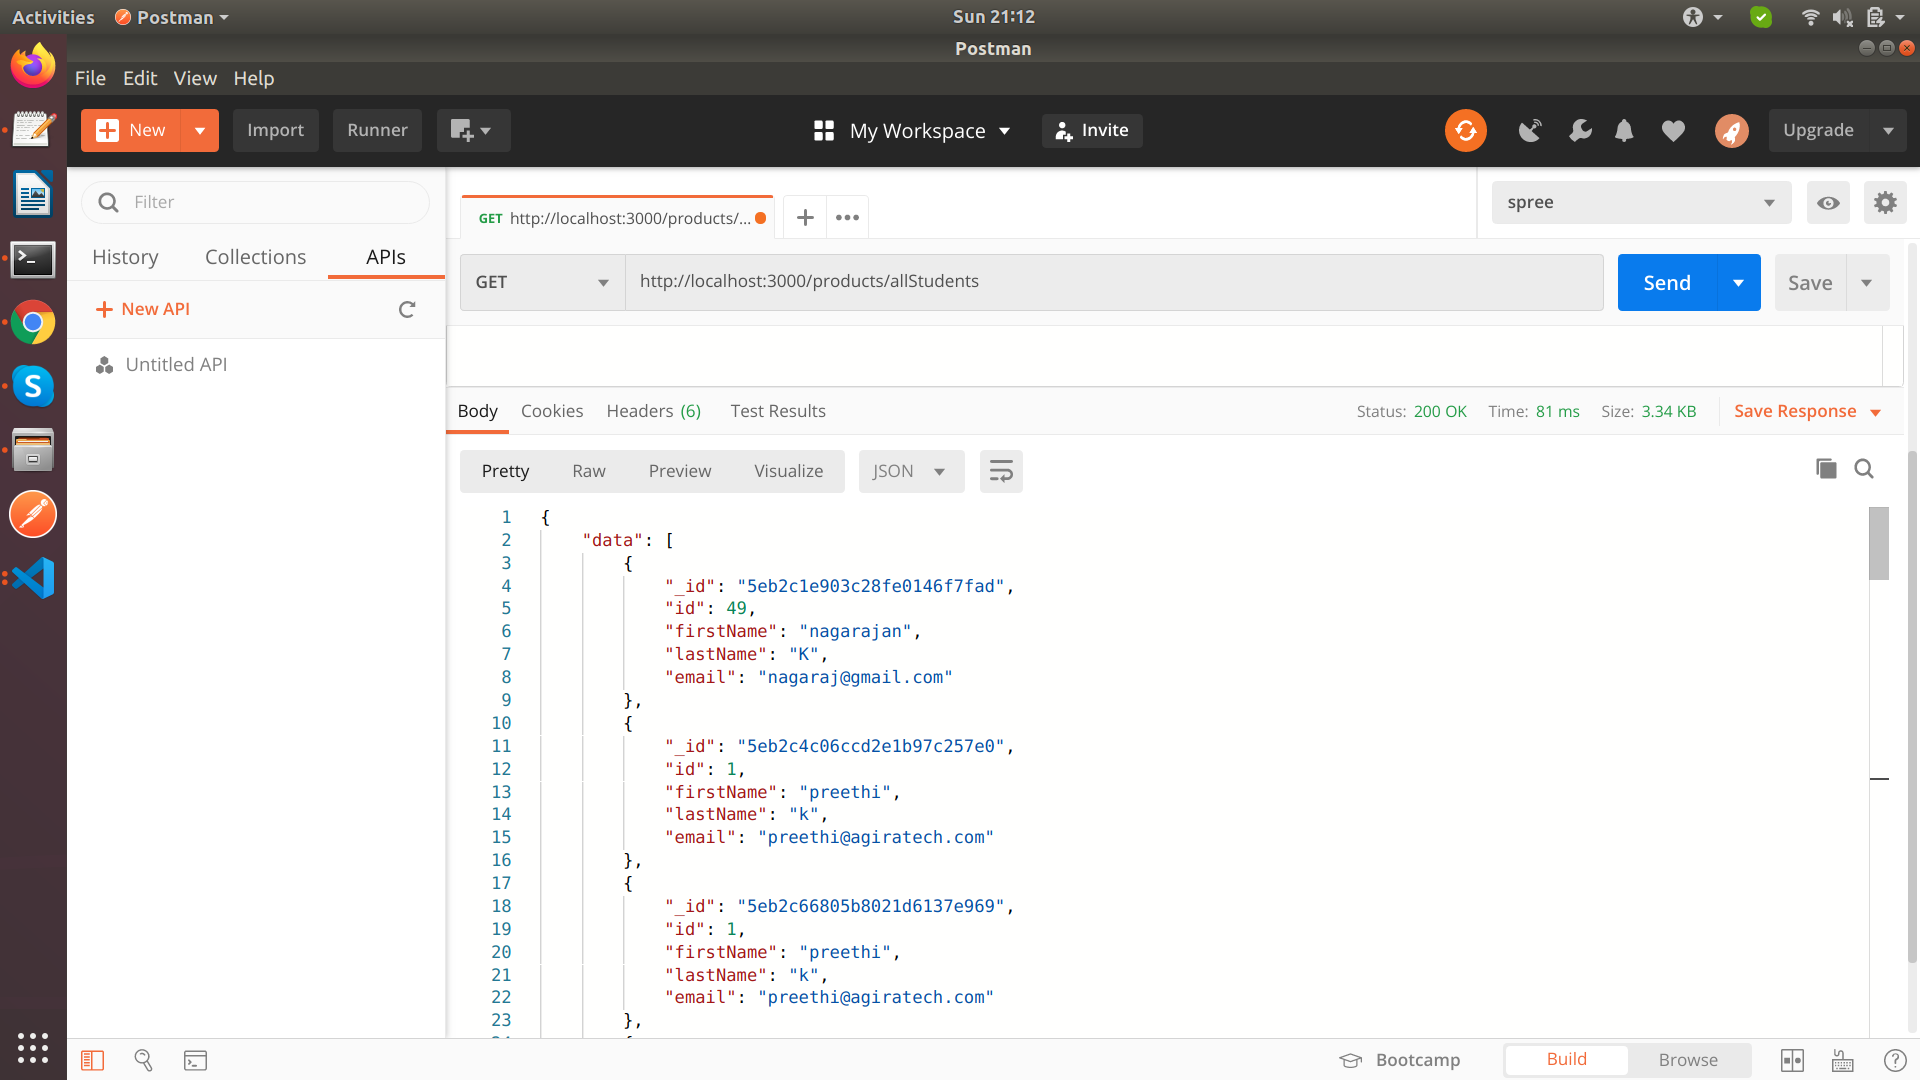
Get all student (GET request)
 exports.get_Student = function (req, res, next) {
  Student.find({})
   .then((response) => {
     console.log("response", response);
     res.json({
       data: response,
       msg: 'Getting all the student data'
      });
   })
   .catch((err) => {
     res.send('error has occured', err);
   })
};
we will import Controller and apply getstudent method.
router.get('/allStudents', product_controller.get_Student);
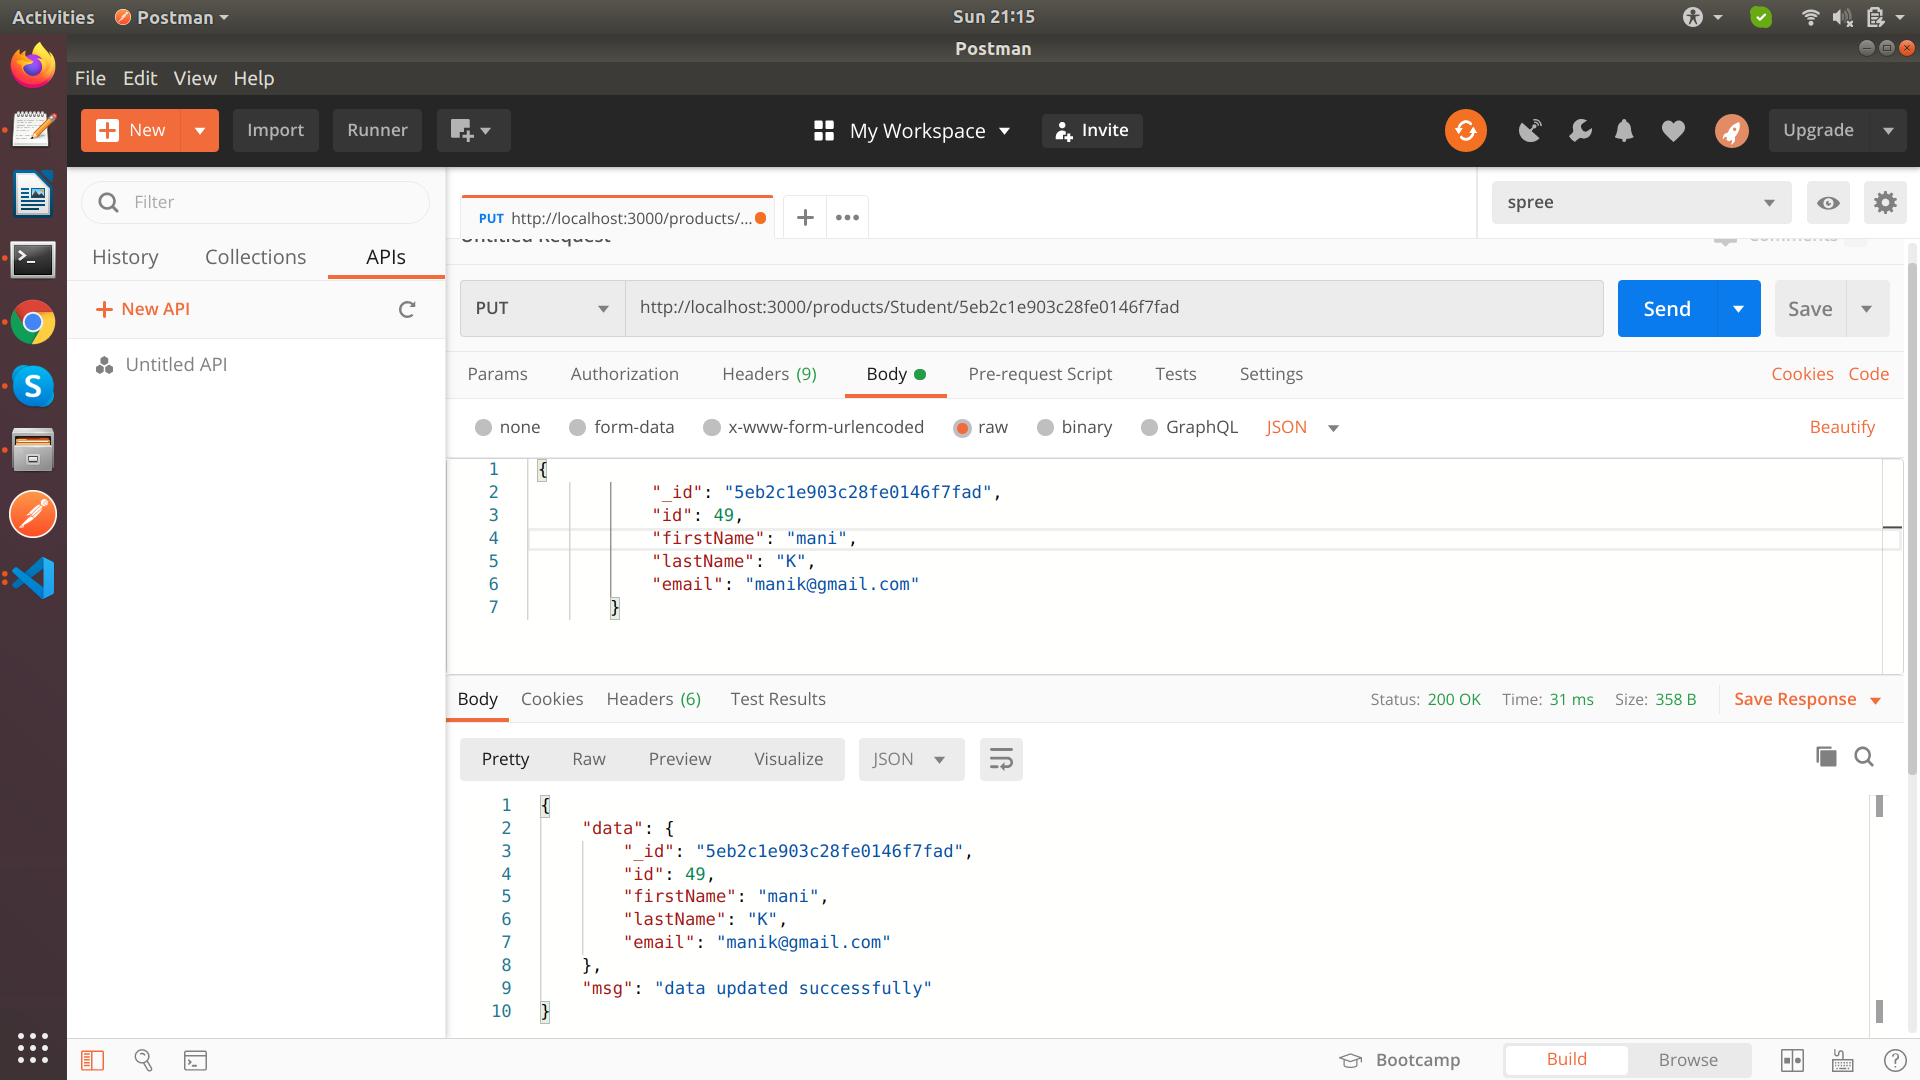
Update a single student (PUT method)
Remember that, without {new: true}, the updated document will not be returned.
exports.update_Student = function (req, res) {
 Student.findOneAndUpdate(req.params._id, {
   id: req.body.id,
   firstName: req.body.firstName,
   lastName: req.body.lastName,
   email: req.body.email,
 }, { new: true, useFindAndModify: false }, function (err, result) {
   if (err) {
     console.log('err', err);
     res.send('error updating student');
   } else {
     console.log(result);
     res.status(200).send({
       data: result,
       msg: 'data updated successfully'
     });
   }
 });
};
In the routes,
router.put('/Student/:id', product_controller.update_Student);
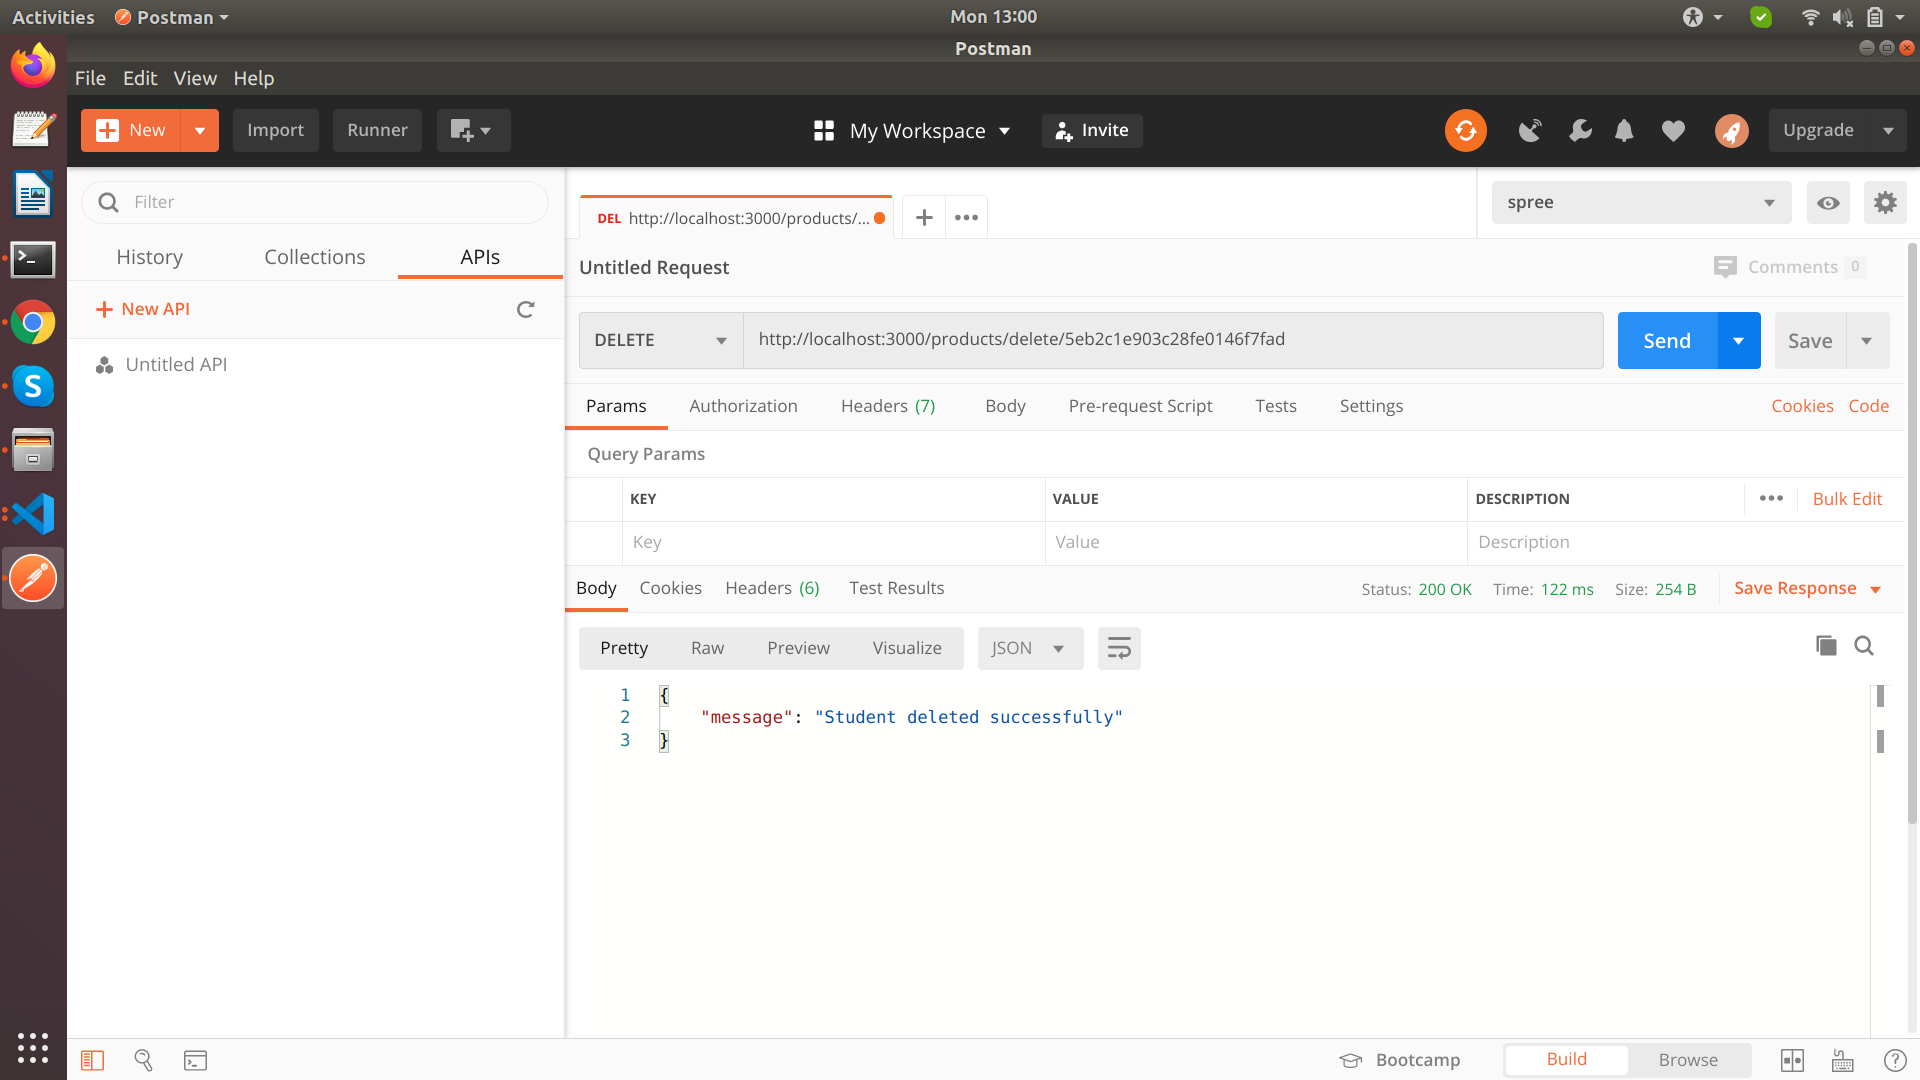
Delete a single contact (DELETE method)
exports.delete_Student = function(req, res, next) {
 Student.findByIdAndRemove({_id: req.params.id}, function(err, hero) {
     if(err) {
         res.json({
             error : err
         })
     }
     res.json({
         message : "Student deleted successfully"
     })
 })
}
In the routes,
router.delete('/delete/:id', product_controller.delete_Student);
API Calls
Below are the all screenshots of all APIs call, which having REST APIs and results of these APIs.
Create API
Get API
Update API
Delete API
If you’re looking for highly experienced and talented Node.js developers, you can get in touch with technical advisors to find a developer at your affordable price. At Agira Technologies, we have flexible models that can help your development in better ways possible.