ReactJS has become a versatile development platform for developers across the globe. It is a specially designed framework for performance and productivity.
Today let’s see how to make a simple “note-taking” application with ReactJS in under 30 minutes.
What is React?
React is a declarative, efficient, and flexible JavaScript library for building user interfaces. It lets you compose complex UIs from small and isolated pieces of code called “Components”.
Install React
To get started, open the command line interface run the below command,
>> npm install -g create-react-app
Note: When using create-react-app ensure you are in the desired directory or folder location as this command will create the project folder in the current path.
Creating “Note-app” application in React
In the command line interface, need to run below the line so that note-app will be created,
>>npx create-react-app note-app
The entire process is automated and begins with creating a new React app folder for the project, then install packages and dependencies. Default, packages include react, react-dom and react-scripts and it will take a few minutes
Run an application in React
>> cd note-app
>> npm start
Default In local, React applications are running in http://localhost:3000/ it looks like this,
In this application, I’m going to use “react-bootstrap” for responsive and icons from “font-awesome”.
Here, we can find how to use these packages in our application
How to use React-bootstrap?
Install it with this following command,
>> npm install react-bootstrap bootstrap
Below stylesheet link, we need to add in index.html
<link
rel="stylesheet"   href="https://maxcdn.bootstrapcdn.com/bootstrap/4.3.1/css/bootstrap.min.css"   integrity="sha384-ggOyR0iXCbMQv3Xipma34MD+dH/1fQ784/j6cY/iJTQUOhcWr7x9JvoRxT2MZw1T"
crossorigin="anonymous"
/>
Usage in Application
import { Button } from 'react-bootstrap';
In the render return statement like follow.
<Button variant="secondary">Close </Button>
How to use Fontawesome in React Applications?
Install the following packages using npm,
>> npm i –save @fortawesome/fontawesome-svg-core @fortawesome/free-solid-svg-icons @fortawesome/react-fontawesome
Usage in application
import { FontAwesomeIcon } from '@fortawesome/react-fontawesome';
import { faPlus} from '@fortawesome/free-solid-svg-icons'
In the render return statement like follow,
<FontAwesomeIcon icon={faPlus} /> New Note</Button>
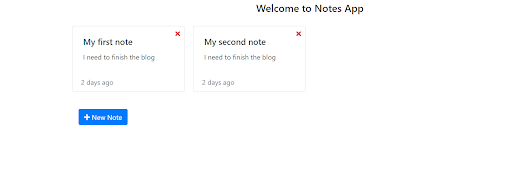
How to display notes as Card?
Initialized the constructor to App component,
constructor(props){
    super(props);
    this.state = {
      notes: props.notes ,
      show: false,
      title: '',
      content: ''
    }
}
In the App component, render function like,
       {this.state.notes.map((note, i )=> {
            return <Col xs={6} md={3} key={i}>
              <Card className="text-center" key={i} >
                <div className="close-icon text-danger" onClick={ (e) => this.removeCard(e, note)}>
                  <FontAwesomeIcon icon={faTimes} />
                </div >
                <Card.Body onClick={(e) => this.updateNote(note, i, e)}>
                  <Card.Title>{note.title}
                  </Card.Title>
                  <Card.Text>
                    {note.content}
                  </Card.Text>
                </Card.Body>
                <Card.Footer className="text-muted">2 days ago</Card.Footer>
              </Card>
            </Col>
          })}
Create a new note
Here, I’ve created one button so when we are clicking on that the form modal will be open while clicking on the save button the note added to state notes then will display in notes Dashboard.
The button code with a click be like,
<Button onClick={ () => this.handleShow('new')}>
The form modal will be like,
     <Modal show={this.state.show} onHide={this.handleClose} centered>
        <Modal.Header closeButton>
          <Modal.Title>{this.state.modalTitle} Note</Modal.Title>
        </Modal.Header>
        <Modal.Body>
          <Form  onSubmit={this.submitNote}>
            <Form.Group>
              <Form.Label>Title :-</Form.Label>
              <Form.Control as="textarea" rows="1" name="title" value={this.state.title} onChange={this.changeTitle}>
              </Form.Control>
            </Form.Group>
            <Form.Group>
              <Form.Label>Content :-</Form.Label>
              <Form.Control as="textarea" rows="3" name="content" value={this.state.content} onChange={this.changeContent}>
              </Form.Control>
            </Form.Group>
            <Button variant="secondary" onClick={this.handleClose}>
              Close
            </Button>
            <Button variant="primary" type="submit">
              Save Changes
            </Button>
        </Form>
        </Modal.Body>
      </Modal>
In the handleShow() function maintains showing the modal and initializing the form values like,
  handleShow = (type) => {
    if (type === 'new'){
      this.setState({id: 0, title: '', content: '', modalTitle: 'Create a New'});
    }
    this.setState({show: true});
  };
While closing, we need to set the show state as false.
  handleClose = () => {
    this.setState( {show: false});
  }
When submitting the changes, form values adding to notes array.
  this.updatedNotes =  [...this.state.notes, {
        id: this.state.notes[this.state.notes.length - 1] ? this.state.notes[this.state.notes.length - 1].id + 1 : 1,
        title: this.state.title || 'Untitled Title',
        content: this.state.content || 'Untitled Content'
      }];
  this.setState({
      notes: this.updatedNotes,
      title: '',
      content: '',
      show: false
  });
Update a note
If we want to update existing notes then we just need to click on a notecard, after that form modal opens with respective card values
 updateNote = (note, index, event) => {
    event.preventDefault();
    this.setState({
      id: note.id,
      title: note.title,
      content: note.content,
      show: true,
      modalTitle: 'Update'
    });
  }
While saving the changes, it will update in the existing notes as,
this.updatedNotes = this.state.notes.map((note) => {
     if (note.id === this.state.id) {
       note.title = this.state.title;
       note.content = this.state.content;
     }
     return note;
  });
  this.setState({
      notes: this.updatedNotes,
      title: '',
      content: '',
      show: false
  });
Remove the Card
Remove icon will be present for each card if we are clicking on the button, for that we are calling removeCard() function and based on Card Id we are removing that particular card from the notes list.
 removeCard = (event, note) => {
    event.preventDefault();
    this.allNotes = [...this.state.notes];
    const noteIndex = this.allNotes.indexOf(note);
    this.allNotes.splice(noteIndex, 1);
    this.setState({
      notes:  this.allNotes
    });
  }
You can find the code available on Github here.
Was this helpful? Share with your ReactJS folks out there! Feel free to comment on your doubts and suggestions in the comment section.
Looking for highly skilled ReactJS developers? Hire React developers at Agira. Get started with your dream project right with our React JS expertise. reach us today!