In this article, we’re going to learn the basics of Nrwl’s tool Nx and Angular CLI Schematic as well as how to create a custom workspace CLI schematic. Let’s get into it.
Schematic in Angular CLI
Schematic is a template-based code generator that contains the set of instructions to generate or modify the application codes. It’s a packaged collection of instructions and can be installed using npm.
With schematic collections, we can customize Angular application to suit the particular needs of an organization and also Angular CLI uses the schematic to create new components, services, and more when you run the ng generate command.
Most of the enterprise teams need their codes to be consistent, safe, well structured and follow the best practices. If you work alone or with a small team it won’t be a big deal because in small groups they might able to have decisions about coding standards and best practices.
But if work you with dozens or perhaps hundreds of other people it becomes difficult and also all the organization like to maintain their own standards. With schematics, you can define own standards like the structure of components, new module, etc.
We are about to create our own custom schematic. Following are some benefits creating schematics collection:
- Generate commonly used UI patterns.
- Generate organization-specific components using predefined templates or layouts.
- Enforcing thee developers to follow the organizational architecture.
Also read: Top 10 Angular CLI Commands To Boost Your Productivity
What is Nx?

Nx is the extension from Nrwl. Its an extension for Angular CLI help to solve consistency, safety, and maintainability problems and also including schematic to implement monorepo-style development. It also contains libraries, linters, and code generators to help large teams create and enforce best practices across their organizations. Here are some of the benefits.
- Nx will help to maintain state management between multiple applications.
- Nx is used to create large Angular applications.
- With NX, we can build better, standardized applications.
Install Nx
Installing Nx is not a big work and it is just an npm command.
npm i -g @nrwl/schematics
Installing Nx globally is only required when we create our workspaces from scratch. If you’re not able to install globally you can also install Nx for existing Angular project by running below command.
ng add @nrwl/schematics
Create a Workspace
We have to install Nx, Now let’s create a workspace. What is workspace? To be precise, workspace is monorepo, a repository that contains related applications and libraries.
Let’s imagine we have to develop a project for one fruit product shop and let’s think it has different features like follows:
- Front-end application to browse and buy fruits.
- Other front-end application for the admin to manage fruit stocks and shopping details.
- Shared UI components between the front-end pages.
- Data store to share data between front-ends.
We have to keep each in separate applications for better code management. But it’s too difficult to keep all the projects in sync, managing dependencies and ensuring that all developers working with correct access and standards. With monorepos, we can solve these problems by creating a workspace with defining rules.
As we have already installed globally, we can run the below command to create a new workspace.
npx create-nx-workspace the-fruits-shop
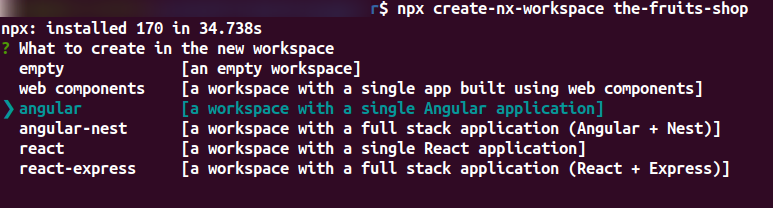

When we run this command you will prompt three questions.
What to create in the new workspace
As we are going to create a workspace for Angular, just select angular from the list.
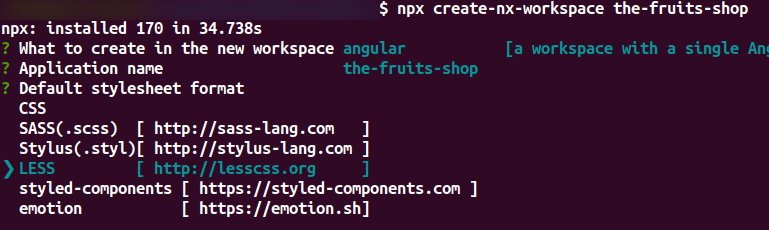
Application name
This will create a shorthand name to import libraries internally. For, example here we set as the-food-shop so it will be used @the-food-shop to import packages.
Default style sheet
Define your style sheet format what we need to do used in this workspace.
Here am going to use LESS so we can write nested CSS.
This command will create a new Angular CLI workspace. it will look different than Angular applications. In usual Angular, you’ll see src folder but here the folder structure will be different. In workspace you’ll have apps, libs and tools folder in the root also will have some configure file like nx.json to configure Nx. Nx will automatically set-up everything for us so let writing code.
Create an Application
Let’s create a new Angular application with a route in our workspace. Go to the ‘apps’ folder and run the following command.
ng generate app the-fruits-shop --routing
It will prompts ‘Which stylesheet format would you like to use?’ select which format you want to use and press enter. After running this command, you will see the the-fruits-shop folder under apps similar Angular folder structure and along with you can see that the-fruits-shop-e2e folder to write e2e test code. It is a bit differs the normal Angular, because in normal Angular we will have e2e folder inside the root folder.
Create a Library
Libraries are the places to write you shared UI components or data services for multiple applications. We can add libraries to the workspace by using AngularCLI command “generate“.
ng g lib shared-modules
This command with creating shared-modules under libs for with src folder hold shared components and services. Using ng g command we can create UI components or services into the libs by adding –project=<lib name> in command like follows:
ng g component lists --export=true --project=shared-modules
Now we have our very own Nx workspace to manage our applications. Let create custom workspace schematics.
Creating a Custom Schematic
As we already discussed schematic holds the set of instructions to generate or modify the application codes. And Angular CLI uses the same to create new components, services, and more when you run the ng generate command. We have also created our own schematics with or without Nx. But Nx makes it easy by creating a workspace and installing dependencies. Custom schematics are frequently used for;
- Enforce developers to flow the styles or standards.
- Generate custom code specific to organization.
Here, we are going to create a schematic for developers to generate a module for their application. With is we are going to do four things:
- Validating module prefix should be ‘fruits-‘.
- Create a module with giving a name and import it into the project’s AppModule.
- Then, create a service with an empty service to handle data access.
- Create an empty component with a module name.
Let’s get started.
STEP 1: Generate the Custom Schematic
By running below command we can generate custom schematic with Nx initial code.
ng g workspace-schematic module-layout
workspace-schematic is Nx command that will create ‘module-layout‘ inside the tools/schematics folder. Each schematic with contains to files schema.json and index.ts.
STEP 2: Update schema.json
It will contain metadata for custom schematic. With this, we can manage options need use.
{
 "$schema": "http://json-schema.org/schema",
 "id": "module-layout",
 "type": "object",
 "properties": {
   "name": {
     "type": "string",
     "description": "Library name",
     "$default": {
       "$source": "argv",
       "index": 0
     }
   }
 },
 "required": ["name"]
}
Here, “properties” attribute is used to define option/property we can pass to the schematic and $default parameter used to let the CLI knows which index of argument we need to use. By default, it will accept name property and CLI will consider index 0 names because in $default you can index defined as 0.
Let’s add one more property to specify the project which we’ll create our new module. Under the name property.
// add under the name property:
   "project": {
     "type": "string",
     "description": "Project to add the auth module to"
   }
Make this as required by adding the property into the required array. Final output will be like this,
{
 "$schema": "http://json-schema.org/schema",
 "id": "module-layout",
 "type": "object",
 "properties": {
   "name": {
     "type": "string",
     "description": "Library name",
     "$default": {
       "$source": "argv",
       "index": 0
     }
   },
   // add under the name property:
   "project": {
     "type": "string",
     "description": "Project to add the auth module to"
   }
 },
 "required": ["name", "project"]
}
You can add more options based on your requirement.
STEP 3: Update the index.ts
Index.ts is an important file which will hold all our custom schematic implementation.
import { chain, externalSchematic, Rule } from '@angular-devkit/schematics';
export default function(schema: any): Rule {
 return chain([
   externalSchematic('@nrwl/schematics', 'lib', {
     name: schema.name
   })
 ]);
}
Now, let’s see what is happening here! We are importing chain, externalSchematic and Rule by default. The rule is a piece of schematic which tells CLI how to modify the filesystem.
The chain is an operator it will combine the rules and externalSchematic is function it will refer the external schematic package and compose the rules for custom schematic. For more schematic function and operator refer to this link.
Let’s modify the existing code to generate a module instead of lib.
externalSchematic('@schematics/angular', 'module', {
     project: schema.project,
     name: schema.name,
     routing: true,
     module: 'app.module.ts'
   }),
It will create a module file with a given name under app.module.ts in specific project. To create service and components we need import path.
import * as path from 'path';
// add as last import
Let add rules to create empty service and components:
externalSchematic('@schematics/angular', 'component', {
     project: schema.project,
     name: schema.name,
     path: path.join(
       'apps',
       schema.project,
       'src',
       'app',
       schema.name
     )
   }),
   externalSchematic('@schematics/angular', 'service', {
     project: schema.project,
     name: schema.name,
     path: path.join(
       'apps',
       schema.project,
       'src',
       'app',
       schema.name,
       'services'
     )
   })
Finally, let’s add code to validate module prefix:
// Add this above the chain function
if (!schema.name.startsWith('fruits-')) {
   throw new Error(`All the modules must be prefixed with 'fruits-'`);
 }
Above code will throw an error if the developer doesn’t use prefix as “fruits-”. The finished code for our custom schematic looks like this:
import { chain, externalSchematic, Rule } from '@angular-devkit/schematics';
import * as path from 'path';
export default function(schema: any): Rule {
 if (!schema.name.startsWith('fruits-')) {
   throw new Error(`All the modules must be prefixed with 'fruits-'`);
 }
 return chain([
   externalSchematic('@schematics/angular', 'module', {
     project: schema.project,
     name: schema.name,
     routing: true,
     module: 'app.module.ts'
   }),
   externalSchematic('@schematics/angular', 'component', {
     project: schema.project,
     name: schema.name,
     path: path.join(
       'apps',
       schema.project,
       'src',
       'app',
       schema.name
     )
   }),
   externalSchematic('@schematics/angular', 'service', {
     project: schema.project,
     name: schema.name,
     path: path.join(
       'apps',
       schema.project,
       'src',
       'app',
       schema.name,
       'services'
     )
   })
 ]);
}
Run the Custom Schematic
Now, we’re ready to use our first custom schematic. Just run the below command to create your module using our custom schematic:
npm run workspace-schematic -- module-layout fruits-management --project=the-fruits-shopi
This command runs the workspace-schematic script that’s part of Nx. We use the — operator to pass options into that script like the names of the module and project. After schematic executed, we can see the new module “fruits-management” created inside the “the-fruits-shop-ui” project.
You can find all the finished code in the repository.
Must read: Run Angular CLI Repos directly In Your Browser
If you have any doubts related to Angular CLI schematics. Phrase it below in the comment section, we’ll get back to you right away. And for Angular related articles take an exploration stroll in our blog.
Are you looking for Angular developers to build your application? Here is the comprehensive guide on how to hire Angular developers. Also, it guides you with the following topics.
- Angular developer skills.
- How an ideal Angular developer resume should look.
- Top Angular developer tools.
- Commonly asked Angular developer interview questions.
- Present Angular developer job opportunities.
If you like to get more updates on technologies, Get your free subscription now! and enjoy the remarkable newsletters from Agira Technologies.