Before jumping to the topic, first, why we’re talking about Docker in Node.js development & why we need to dockerize an application ? If you already know the answer well that’s great, you can straightly jump into the steps involved in it. Incase, if you’re new to Docker then here is the simple explanation for you to understand the docker better.
So,
What is docker and Why are we using Docker container? What’s the advantage of it?
Docker will allow the users to wrap the whole application with all its integrated part like dependencies, libraries & all of its part and this will be produced as a single package. Therefore, we can be assured of the execution of the application on any Linux machine regardless of it’s production environment. As the result, developers can easily distribute & manage application within containers. Hopefully, you might know why we are dockerzing a node.js application.
Dockerizing A Node.Js Application
Let’s take a simple node application that defines a web app using the Express.js framework:
'use strict';
const express = require('express');
const PORT = 8080;
const HOST = '0.0.0.0';
const app = express();
app.get('/', (req, res) => {
res.send('Hello world\n');
});
app.listen(PORT, HOST);
console.log(`Running on http://${HOST}:${PORT}`);
Steps To Dockerize A Node.js application
Basic steps involved in Dockerizing the app are :
1. Specify the LTS version of available node from the Docker Hub, here i took latest version 8.
2. Create an application directory, to store our application, inside the docker image
3. Copy Package.json and install dependent packages using npm install
4. Copy the application source files, inside docker image
5. Bind to port 8080 and define the runtime using ‘npm start’.
The generated Dockerfile must be:
FROM node:8
# Create app directory
WORKDIR /usr/src/app
# Install app dependencies
# A wildcard is used to ensure both package.json AND package-lock.json are copied where available (npm@5+)
COPY package*.json ./
RUN npm install
# Bundle app source
COPY . .
EXPOSE 8080
CMD [ "npm", "start" ]
We can also prevent your local modules and debug logs, using .dockerignore file.
Create Docker Image
To build docker image you can use docker images along with -t flag.
$ docker build -t sample/node-docker-app
List Docker Images :
Use the below command to list all the docker images from repository.
$ docker images
It will throw us the following result.
# Example
REPOSITORY                     TAG ID CREATED
node                           8 1934b0b038d1    5 days ago
sample/node-docker-app     latest      d64d3505b0d2    1 minute ago
To Run The Docker Image
So, how to run the docker image? Having idea? No! No issues! Just use the below command to run it.
$ docker run -p 3000:3000 -d sample/node-docker-app
use -d will run in detached mode, leaving the container running in the background and the -p flag redirects a public port to a private port inside the container.
Docker Logs Example
You can use docker logs command to print the docker app output & but before getting docker logs we must get the container ID of Docker. Before that you can also list the currently running docker container’s to make it easier.
List All The Running Docker Container
$ docker ps
The result must be,
# Example
ID             IMAGE                                COMMAND ... PORTS
ecce33b30ebf  sample/node-docker-app:latest  npm start   ...   3000>3000
Get Docker Container ID
Follow the below command to get docker container id.
$ docker logs <container id>
Hope you must be seeing your docker files in localhost now.
Interact With Docker Container
Use the exec command to get inside & interact with docker container
$ docker exec -it <container id> /bin/bash
To Run The Docker Service
We can either use docker-compose.yaml or curl command to run docker service.
A simple docker-compose.yaml should be like,
version: '3.7'
services:
node-docker-app:
build: .
ports:
- "3000:3000"
Here, Docker mapped the 3000 port inside of the container to the port 3000 on your machine.
After mapping this, run the below command,
docker-compose up
OR
you can use the curl command as i said,
$ curl -i localhost:3000
Now, we’re able to reach the service on http://localhost:3000
Debugging Node.Js In A Docker Container
The next step is to expose the debug port to the outside world. First, let’s create a file named debug-compose.yaml.
version: '3.7'
services:
node-docker-app:
build: .
ports:
- "3000:3000"
- "9229:9229"
command:
- node
- "--inspect-brk=0.0.0.0"
- "."
As you can see in the above code that we have opened the port 9229 parallely we have also overrided the command which we specified in dockerfile.
Basically, –inspect-brk=0.0.0.0 argument will do two different things :
- –inspect will inform the Node that we are running our app in debugging mode.
- -brk will inform to stops the app at the first line, so that we can wait until opening inspector
- Adding =0.0.0.0 opens up the debugger to connections from any IP.
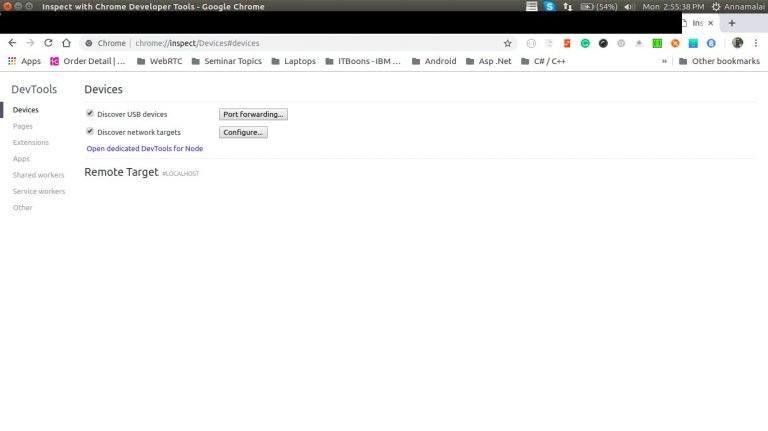
By default, the inspector is bound to 127.0.0.1 as we don’t allow people from outside world to attach a debugger to our app. However, the container is a different host with a different IP than our host machine, so we won’t be able to reach it. For this reason we have a different file from docker-compose.yaml as debug-compose.yaml. After all these changes, we can able to inspect app in dev tools, under the Remote Target.
Debugging In Visual Studio Code
When there is a single file in our application debug, we can just do it with the help of Inspector. But, when there is an issue with a project, having sequence of files within it , it’s better to attach the debugger using an IDE.
Here we are taking Visual Studio Code, as our debugging tool.
First, navigate to the debug tab , then click on the ‘gear’ icon, to open ‘launch.json’.
Then click the gear icon from the popup list, select docker.
Note : For this, Docker extensions have to be installed.
When, a docker environment is selected, it will generate a ‘launch.json’ in the projects .vscode folder that looks like this:

After debugging in Visual Studio Code (F5), debugger will be prompted in VSCode so once it’s pressed again, the server will start listening & will add a breakpoint within the application which will help in debugging an application based on its flow.
Cheers guys! We’re done with dockerizing a node.js application. Hope this helps and now give a try by yourself and let us know your thoughts in the comment section.
[contact-form-7 404 "Not Found"]