A web crawler is an interesting way to obtain information from the vastness of the internet. Large amount of the world’s data is unstructured. Websites are a rich source of unstructured text that can be mined and turned into useful insights. The process of extracting such information from websites is referred to as Web scraping. The information extracted can then be used in several and useful ways.
There are several good open source web-scraping frameworks. We can write a web crawler using such frameworks. Some of such frameworks are Scrapy, Import.io and Heritrix.
Scrapy stands out from the rest since it is:
- Easy to setup and use
- Great documentation
- Built-in support for proxies, redirection, authentication, cookies, user-agents and others
- Built-in support for exporting to CSV, JSON and XML
This article will walk you through installing Scrapy, writing a web crawler to extract data from a site and analyzing it. It is written based on Ubuntu. But it will work in other Linux libraries too.
Pre-requisites:
Python:
Scrapy framework is developed in Python, which is already installed in Ubuntu and almost all Linux distributions. So we need to make sure Python is installed with help of the below command:
python --version
Pip:
To get the latest Scrapy version, we will use the pip (Python Package Management System) method. To install pip on Ubuntu along with needed dependency, use the following command:
sudo apt-get install python-dev python-pip libxml2-dev libxslt1-dev zlib1g-dev libffi-dev libssl-dev
Installing Scrapy
After installing pip, install Scrapy with the below command:
pip install Scrapy
To make sure that Scrapy is installed correctly, use the following command:
scrapy version
The result should be something like the following:
Scrapy 1.0.5
Using Scrapy:
This article will walk you through these tasks:
- Scraping walk through
- Creating a new Scrapy project
- Creating a new spider
- Defining the crawl fields for your web crawler
- Extracting the data
- Launch the spider
Scraping walk through:
For this guide, we will use an example in which we shall extract products information from one of the largest E commerce sites in India. We will start with the product list and follow the links to each product and scrape some data from each page.
Use the Firebug or Firepath plugin to determine the selectors for the product title and other necessary information. Alternatively, have a look at the code in the next section to view the selector values, as shown below:
Creating a new Scrapy project:
Before you start scraping, you will have to set up a new Scrapy project. Enter a directory where you’d like to store your code and run:
scrapy startproject <your project name>
This will create a following directory and their files:
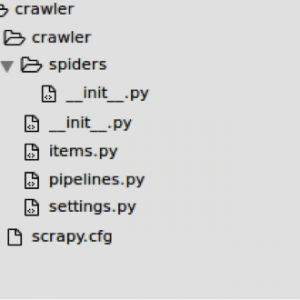
There are several files and one folder named “spiders”. I don’t want to mess it up for you, so I would like you to just concentrate on two things: the items.py file and spiders folder.
Creating a new spider:
After creating project, generate spider with following command:
scrapy genspider <spider name> <website domain>
Eg: scrapy genspider ecommerce ecommerce.com
This creates the ecommerce.py file inside the spider folder.
Your initial spider looks like below
# -*- coding: utf-8 -*-
import scrapy
Class EcommerceSpider(scrapy.Spider):
name = "ecommerce"
allowed_domains = ["ecommerce.com"]
start_urls = (
'http://www.ecommerce.com/',
)
def parse(self, response):
 pass
This is where we will tell Scrapy how to find the exact data we’re looking for. As you can imagine, this is specific to each individual web page that you wish to scrape.
The first few variables are self-explanatory (docs):
- name defines the name of the Spider.
- allowed_domains contains the base-URLs for the allowed domains for the spider to crawl.
- start_urls is a list of URLs for the spider to start crawling from.
Defining your crawl fields:
When working with Scrapy, you must specify what you want to get after crawling, which is called an item (model). To do this, open the items.py file and add the fields based on your requirement:
import scrapy
class CrawlerItem(scrapy.Item):
# define the fields for your item here like:
title = scrapy.Field()
price = scrapy.Field()
pass
Extracting the data:
We need to parse and scrape the data we want, which falls within the DOM element. Again, update ecommerce.py like below:
def parse(self, response):
for href in response.xpath(".//*[@class='browse-grid-row']/div/div/div/a"):
url = ''.join(href.xpath("@href").extract())
request_url = response.urljoin(url)
yield scrapy.Request(request_url, self.product_details)
def product_details(self, response):
item = CrawlerItem()
title_node = ".//*[contains(@class,'title-wrap')]/h1/text()"
price_node = ".//*[@class='prices']/div/span[contains(@class,'selling-price')]/text()"
item['title'] =''.join(response.xpath(title_node).extract())
item['price'] =''.join(response.xpath(price_node).extract())
return item
Here, we are iterating through the product list and assigning the product title and price values from the scraped data
Launch the spider:
Ready to launch your crawl spider, simply run the following command:
Scrapy crawl ecommerce
Also, you can render the output as JSON file with below command:
scrapy crawl ecommerce -o output.json
Deploying the project:
Writing a web crawler is just the beginning – you still need to deploy and run your crawler periodically, manage servers, monitor performance, review scraped data and get notified when spiders break. This is where Scrapy Cloud comes in. Scrapy Cloud is a service of the Scrapinghub Platform. This data scraped can be used in several ways, including deploying the data into private data servers.
With Scrapy, deploying is as easy as running:
shub deploy
For more details about scrapinghub platform, check this Scrapinghub Platform.
Was this helpful? Share it with your network! Subscribe to stay tuned with technology updates you should know.