Building a Chrome extension is not a big deal at all if you understand the fundamentals of its development. You might obviously be knowing what is a Chrome extension. The chrome extensions are tiny software modules that have the capability to customize your web browser i.e. Chrome and it gives new features to your browser to enhance your browser experience. By using Chrome extensions, one can a personalized web browsing experience. These useful chrome extensions are built using simple web technologies like HTML, JavaScript and CSS. So, here is a blog on how to build a chrome extension as a beginner.
In this blog, I ‘ll show you how to create a basic Browser Action extension, which is a basic extension that has an HTML page along with a few executable Javascript.
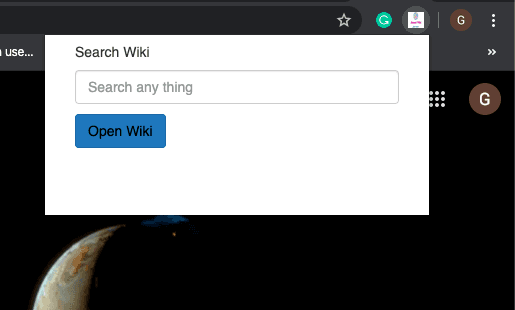
Here, in the browser extension that I am building will have a text input. So that you can search for something and then when you click the submit button it will open your search in Wikipedia.
Chrome extensions can do a lot more things like this. You can make them work for certain pages. Chrome Extensions can modify the HTML dom by using Content Scripts. They can also run code in the background using background pages. But, to simplify things, we going to learn about building the basics first.
Step-by-Step Process to Build a Chrome Extension
Step 1: Create a project folder for a chrome extension and add an icon in 128X128 for logo
Step 2: Then add manifest.json
The Manifest.json file gives all the essential details of your extension to the browser such as its name and the information about all the requirements and permissions it needs. Creating a direction is one of the most basic and simple chrome extension that you can build in minutes. So, here, we will build a directory and put this JSON into Manifest.json as shown in the code snippet.
{
"manifest_version": 2,
"name": "Search Wiki",
"description": "you can enter the key word to navigate to wiki page",
"version": "1.0.0",
"icons": {"128": "logo_128.png"},
"browser_action": {
"default_action": "logo.png",
"default_popup": "popup.html"
}
}
As shown above, it is important to provide all the possibly required fields to the manifest.json. Also, ensure that you are using Manifest version 2 because the previous version is unsupported. And now, even though nothing is coded inside our extension, we are going to load it into the chrome.
Step 3: Add the Browser Action
The browser action adds a little icon near the address bar which lets the extension to perform an action when someone clicks on that button.
Put the logo.png from Google’s extension tutorial in your extension folder and add this to manifest.json:
"browser_action": {
"default_action": "logo.png",
"default_popup": "popup.html"
},
In order to use the browser action, we added the HTML for the browser action
In the HTML you can add CSS and Javascript, that required to your chrome plugin
This my HTML code:
<!DOCTYPE html>
<html>
  <meta charset="utf-8">
  <meta name="viewport" content="width=device-width, initial-scale=1">
  <link rel="stylesheet" href="https://maxcdn.bootstrapcdn.com/bootstrap/3.4.1/css/bootstrap.min.css">
  <script src="jquery.min.js"></script>
  <script src="bootstrap.min.js"></script>
<script src="popup.js" ></script>
<style>
      /* Modal Structure */
      html,
      body {
        font-family: "Open Sans", sans-serif;
        font-size: 14px;
        margin: 0;
        min-height: 180px;
        padding: 0;
        width: 384px;
      }
      h1 {
        font-family: "Menlo", monospace;
        font-size: 22px;
        font-weight: 400;
        margin: 0;
        color: #2f5876;
      }
      a:link,
      a:visited {
        color: #000000;
        outline: 0;
        text-decoration: none;
      }
      img {
        width: 30px;
      }
      .modal-header {
        align-items: center;
        border-bottom: 0.5px solid #dadada;
      }
      .modal-content {
        padding: 0 22px;
      }
      .modal-icons {
        border-top: 0.5px solid #dadada;
        height: 50px;
        width: 100%;
      }
      .logo {
        padding: 16px;
      }
      .logo-icon {
        vertical-align: text-bottom;
        margin-right: 12px;
      }
      .version {
        color: #444;
        font-size: 18px;
      }
      .flex-container {
        display: flex;
        justify-content: space-between;
        padding: 10px 22px;
      }
      .flex {
        opacity: 1;
        transition: opacity 0.2s ease-in-out;
        width: 120px;
      }
      .flex:hover {
        opacity: 0.4;
      }
      .flex .fa {
        font-size: 40px;
        color: #2f5876;
      }
    </style>
<head>
<title>Search Wiki</title>
</head>
<body>
<div class="col-md-12">
<div class="col-md-6">
<div class="row">
  <div class="col-sm-6">
    <div class="card">
      <div class="card-body">
        <h5 class="card-title">Search Wiki</h5>
        <p class="card-text"><input type="text" placeholder="Search any thing" id="input_value" class="form-control" /><p>
        <a href="#" id="open_wiki" class="btn btn-primary">Open Wiki</a>
      </div>
   </div>
  </div>
</div>
</div>
</body>
</html>
In about code, you can see the CSS and use of the remote link. But in javascript, you can’t use remote source URL. For security reasons, you need to save javascript files inside and use it.
In popup js,
$(document).ready(function(){
$("#open_wiki").click(function(){
  window.open("https://en.wikipedia.org/wiki/"+$("#input_value").val(), '_blank');
})
});
I am just adding the input to the wiki URL to open .
Step 4: Load your extension into Chrome
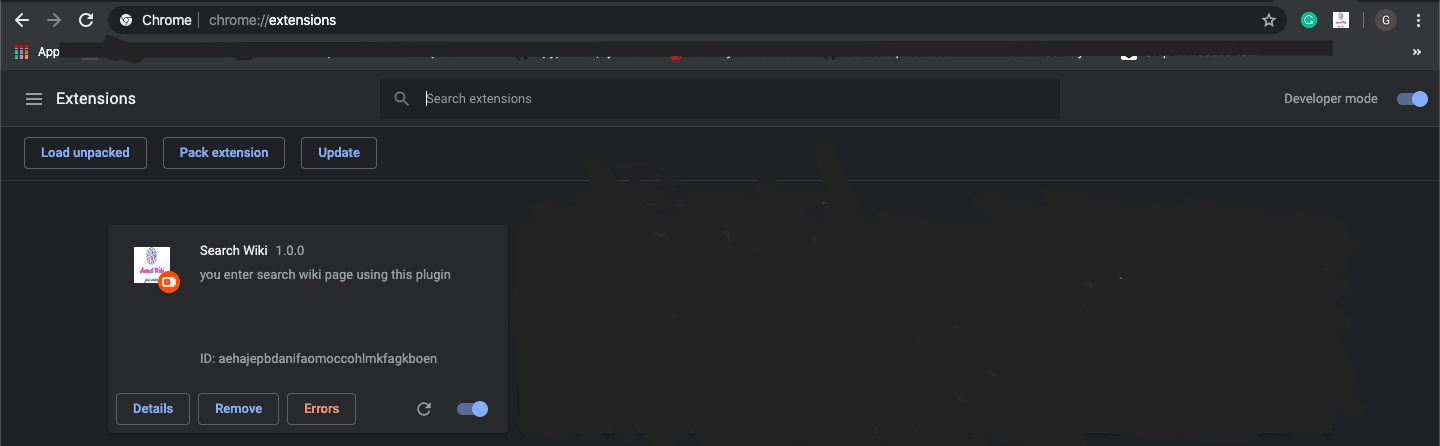
In order to load your chrome extension into the Chrome Browser, you need to open the following link in your browser and click on the “Developer mode”. It is present on the top right corner of the browser. Now, click on “load unpacked extension” and select the extension’s directory to see your extension in the list. You need to come back here and reload the page whenever you add or modify the code of your extension.
Voila! Your Chrome extension is built. Now, test it on your own. Build chrome extensions with any other functionalities that you require. This fundamental technique leads to a concrete path to achieving it.
You might also some other tutorial blogs from other developers like Developing an Express Application Using TypeScript and How To Host A Simple Static Website On AWS S3.
Get in touch with the best web development company in the Industry. Hire skilled web developers right now for your business.