It’s no secret, that Django is the most popular framework written in Python. Let’s see how quickly we can build a RESTful API with Python and Django. I’m sure that this definitive article will put you at ease if you are creating RESTful API with Python and Django. Before we start with the instruction, you should have a basic understanding of API and Python. Even though you are beginner, you can pick it up.
What are an API and Django?
API stands for Application Programming Interface. It is a set of instructions, definitions, protocols and tools that will help you build your own application software. It helps in connecting various software components. Developers use this in various technologies to build applications by using certain predefined operations.
Django is a python based web framework. It is a collection of modules and CMS (Content Management system) is an easy to use and developer-friendly framework.
Let’s get started!
Introduction to REST Framework
REST, Representational State Transfer framework supports HTTP methods to make interactions between the machines. HTTP methods used in REST architecture are:
- GET
- PUT
- POST
- DELETE
Using the above four methods APIs can be configured. But in this blog, we are going to learn how to configure API using GET method.
REST API
Any web service that uses REST architecture is called Restful APIs or Rest APIs. A Rest API is a set of web addresses that respond with pure information and not a formatted web page.
In order to develop a Restful API, you will need to have device access to website data through a common format. Here, we use JSON which is a common data format to build any application.
Setup and Installation
The first thing you need to do is to install Python and Django on your machine. Check if you have installed the updated version of Python.
Then, install “Django” and “Django Rest framework”. Once installed, execute the following commands:
pip install django
pip install djangorestframework
Pip
Pip is a package management software which can be used to set up and manage software packages in python.
Setting up your Project Directory
Setup a project directory in order to create a workspace for your project.
mkdir   Sample-project
Cd  Sample-project
Create a Virtual environment for your project to install library dependencies and packages within your environment without disturbing globally and other environments.
pip install virtualen
To activate the virtual Environment,virtualenv venv
Source venv/bin/activate
Setting up your Django-project
Navigate to your project environment and then create a project by using this command
Django-admin start project demo
Once you create a project you can see several files created with it. The most important file is manage.py which is the root of the project.
This will look like this,
demo/
    manage.py
    demo/
	__init__.py
	settings.py
	urls.py
	wsgi.py
Change into the Django-project directory. We can verify the installation by running the following commands.
Python manage.py runserver
The output will look like,
Performing system checks…
System check identified no issues (0 silenced).
You have unapplied migrations; your app may not work properly until they are applied. Run ‘python manage.py migrate’ to apply them.
Django version 2.2, using settings ‘demo.settings’
Starting development server at http://127.0.0.1:8000/
Quit the server with CONTROL-C.
Navigate to the project by executing the below command,
Cd demo
Create a Django app
django-admin startapp api
It will create a directory named ‘api’ . Inside the API folder, several files will be created with it.
It will look like this,
api/
    __init__.py
    admin.py
    apps.py
    migrations/
	__init__.py
    models.py
    tests.py
    Views.py
settings.py file
Open the settings.py file in the project folder and add these lines in the INSTALLED_APPS section.
INSTALLED_APPS = [
    'django.contrib.admin',
    'django.contrib.auth',
    'django.contrib.contenttypes',
    'django.contrib.sessions',
    'django.contrib.messages',
    'django.contrib.staticfiles',
    'rest_framework',
    'api',
]
Note: If you didn’t register your application in the project settings then your changes to the database won’t happen.
Database
I’m using Postgres database. To set up the Postgres database with the application. First, we have to install Postgres and pgadmin and create one database for the Django project. You can refer site to install Postgres.
I’m using phppgadmin you can also use pgadmin. To install the phppgadmin. You can refer to this site
After installing the Postgres. Add these lines in the settings.py file under Databases.
DATABASES = {
    'default': {
        'ENGINE': 'django.db.backends.postgresql',
        'NAME': 'demo',
        'USER': 'postgres',
        'PASSWORD': 'postgres',
        'HOST': '127.0.0.1',
        'PORT': '5432',
    }
}
Models.py
Each model instance is a definitive source of information about your data. In general, each model appropriates a single table in your database.
class Company(models.Model):
	name = models.TextField(default='')
	stream = models.TextField(default='')
	designation = models.TextField	(default='')
	created_at = models.DateTimeField(auto_now_add=True)
To migrate your changes to the database you can follow the below commands.
Python manage.py showmigrations
It will show the changes to the databases.
python manage.py makemigrations
It will create migrations for those changes.
Migrations for 'api':
  posts/migrations/0001_initial.py
    - Create model Company
python manage.py migrate
Operations to perform:
  Apply all migrations: admin, auth, contenttypes, api, sessions
Running migrations:
  Applying posts.0001_initial... OK
It will migrate the changes to the databases.
Views.py file
Open the views.py file inside the Myapp folder and write the logic which you want to do. Here I will be writing a very simple logic for easy understanding of the concept.
A view function is a Python function which takes a web request and returns a web response.
We have used Django’s generics view method from the rest_framework.
from django.shortcuts import render
from rest_framework import generics
from .models import Company
from .serializers import CompanySerializer
# Create your views here.
class ListCompanyView(generics.ListAPIView):
    """
    Provides a get method handler.
    """
    queryset = Company.objects.all()
    serializer_class = CompanySerializer
This generic view allows you to instantly build API views, that map closely to the database models. The class-based views allow you to compose bits of reusable behavior. The key merit of class-based view is providing a number of pre-built views for commonly used patterns.
Django’s generic views were developed as a shortcut for common usage patterns. They take certain common idioms and patterns found in view development and abstract them so that you can quickly write common views of data without having to repeat yourself.
— Django Documentation
Urls.py
Open the urls.py file and add the following lines.
from django.urls import path
from .views import ListCompanyView
urlpatterns = [
    path('', ListCompanyView.as_view(), name="ListCompanyView")
]
Open the urls.py in the project folder demo and add the following lines.
from django.contrib import admin
from django.urls import path,include
urlpatterns = [
    path('admin/', admin.site.urls),
    path('', include('api.urls'))
]
In the URL we can set up the routes and URL paths to the view function and get the response of the function.
Serialization
Django’s serialization framework provides a mechanism for translating Django models into other formats which can be stored, transmitted and be reconstructed later on.
Create a serializers.py file inside the application folder. We are going to define serializers for our models.
A serializer needs a nested class Meta which defines the meta behavior of the serializer. The serializer needs to know about your model.so. Assign the property model with the name of the model that the serializer is for and define the fields that the serializer should serialize and deserialize. I have used ModelSerializer here.
from rest_framework import serializers
from .models import Company
class CompanySerializer(serializers.ModelSerializer):
    class Meta:
        model = Company
        fields = ("name", "stream", "designation", "created_at")
Django Admin
Create a superuser account with username ‘admin’ with password ‘admin’. You can give anything for name and password. Run the application using
python manage.py runserver
Go to http://127.0.0.1:8000/admin/

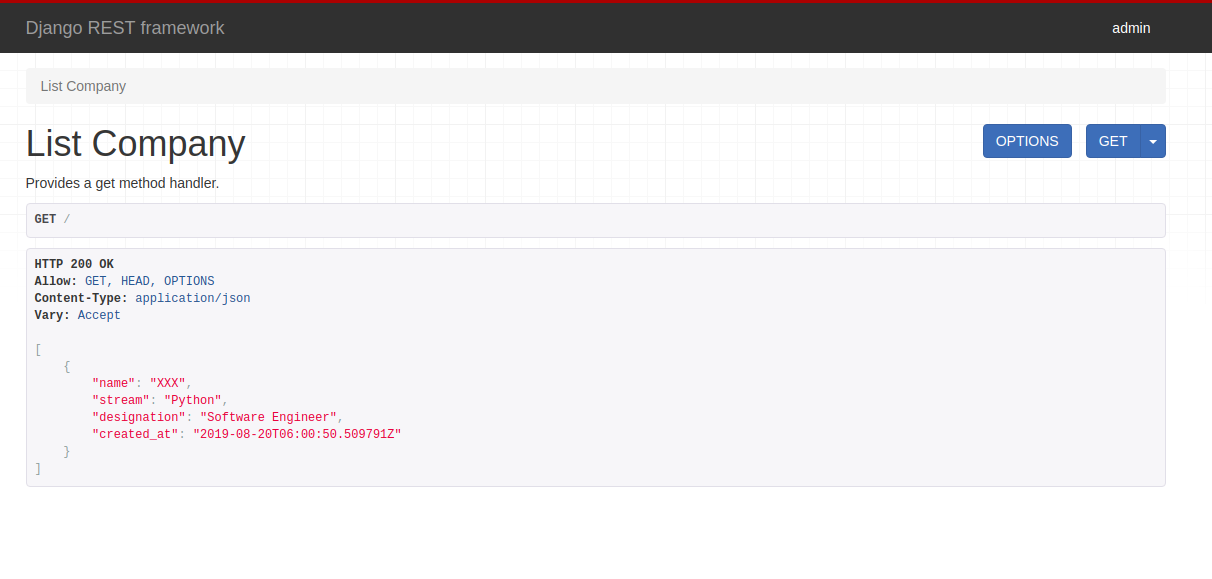
Log in with the username and password which you have given while creating the user. And go to Myapp and update the post’s model records.
Go to http://127.0.0.1:8000 you can see the updates which we have updated just now in the JSON format.
Over to You
From this article, you have successfully managed to develop the REST APIs with Django and Python. Cheers!
Also read:
How To Build And Test Laravel Restful API
If you have any doubts related to developing REST APIs with Python and Django. Phrase it below in the comment section, we’ll get back to you right away. For more interesting articles take a stroll in our blog.
If you like to get more updates on technologies, Get your free subscription now! and enjoy the amazing newsletters from Agira Technologies.