Google has officially announced that Kotlin is the first class language for Android and it’s getting evolving fast and expanding its features every day. We think you don’t want to miss this out. Get Started using Kotlin in Android Development.
In this article, you will read,
what is Kotlin?
What is Android Studio?
How to start with Kotlin?
The basic configuration set up and the complete implementation process with a sample program.
What is Kotlin?
Kotlin is a statically typed programming language which is the combination of objects oriented programming concept and functional oriented programming features. It developed in a way to run on JVM (Java Virtual Machine) and it would be compiled using LLVM compiler infrastructure.
Kotlin designed to support Android studio and you can make use of all Android existing tools with Kotlin code. By adding Kotlin code to your existing project you can convert java language to Kotlin.
Note: In case If you are new to this Android studio, Well it’s never too late to start! Here you can find basic information about Android Studio and the installation process.
What is Android Studio?
Android Studio is an IDE (Integrated Development Environment) which is officially developed and announced by Google for developing android apps. It will provide you quick tools to build instant apps for every Android device with the complete in-built solutions like code Editing, Debugging, Deploying, performance tooling etc and this Android studio will work on various OS like Windows, Linux, Mac etc.
Installation of Android Studio:
Installing Android Studio is too easy than you think. You can download and install with exe file from the below link.
Link to download and installation : https://developer.android.com/studio/install
Configure Kotlin Plugin on Android Studio:
If we need to use the Kotlin in Android Development, we must configure Kotlin Plugin on android.
And it’s not a rocket science like you think; you can do it with simple steps.
In case if you are using the Android studio version below 3.0 then we need to configure it based on below steps.
Steps to Proceed
After installation of Android studio
In the “Welcome to android studio” screen
Choose configure –> Plugins –> Install jetbrains plugin
Now you can search for Kotlin Plugin and start installing it
Once you have done with installation you need to restart the android studio
Note: On other hands, if you are using android studio version 3.0 or above
You don’t need to configure Kotlin in an Android Studio because android studio 3.0 has embedded Plugin of Kotlin with it.
It’s quite a simple right?!
No more waiting, you had successfully started with your Kotlin Plugin so its time to start creating your first project with Kotlin.
Creating a project in Android Studio:
Follow the below steps to create your new project
Step 1: File–> New Project–>
After that, you will see the Create Android Project screen like the screen and there you can add the details of your project like app name, Company domain and also you can set the path for your project.
After that click the Next button to continue the configuration.

Step 2: In the above dialog you can able to choose the platform for which you are going to develop.
For example, Android works on a phone, tablet, wearable’s, TV and etc.
Choose the PHONE AND TABLET from those categories and click the Next button to proceed further.

Step 3: Then there will be an option to choose your basic activities which are pre-built
Now choose Empty Activity from that activities and then click the Next button.
On the next screen, you can provide the activity name and XML layout name.
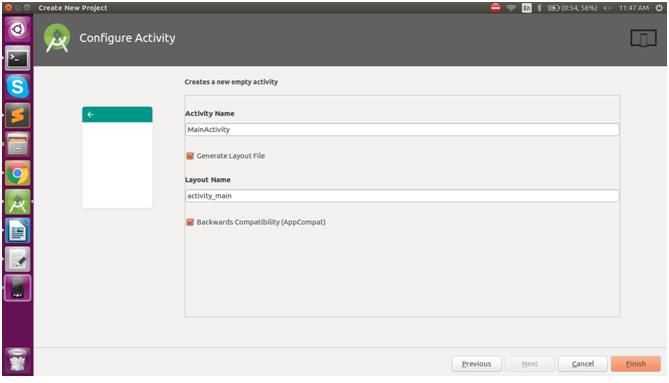
Step 4: Finally click the Finish button and your project will open in an editable window.
And the file will have the default inbuilt codes like below
Coding:
MainActivity.java
package agira.com.myapplication
import android.support.v7.app.AppCompatActivity
import android.os.Bundle
public class MainActivity : AppCompatActivity() {
override fun onCreate(savedInstanceState: Bundle?) {
super.onCreate(savedInstanceState)
setContentView(R.layout.activity_main)
}
}
Note: setContentView(R.layout.activity_main) activity main file is called here to implement the designing process.
You can find the activity main layout file on the left side menu.
Designing
activity_main.xml:
<LinearLayout xmlns:android="http://schemas.android.com/apk/res/android"
xmlns:app="http://schemas.android.com/apk/res-auto"
xmlns:tools="http://schemas.android.com/tools"
android:layout_width="match_parent"
android:layout_height="match_parent"
android:orientation="vertical"
tools:context="agira.com.myapplication.MainActivity">
<LinearLayout
android:layout_width="match_parent"
android:layout_height="wrap_content"
android:layout_margin="4dp"
>
<android.support.v7.widget.AppCompatTextView
android:layout_width="0dp"
android:layout_weight="1"
android:layout_height="wrap_content"
android:text="@string/entername"
android:textSize="15dp"
/>
<android.support.v7.widget.AppCompatEditText
android:layout_width="0dp"
android:layout_weight="1"
android:layout_height="wrap_content"
android:textSize="15dp"
android:maxLength="20"
android:id="@+id/name"
/>
</LinearLayout>
<LinearLayout
android:layout_width="match_parent"
android:layout_height="wrap_content"
android:gravity="center_horizontal"
>
<android.support.v7.widget.AppCompatButton
android:layout_width="wrap_content"
android:layout_height="wrap_content"
android:textSize="18dp"
android:text="Submit"
android:id="@+id/submit"
/>
</LinearLayout>
</LinearLayout>
Note: These above codings are used for designing the layout
AppCompatTextView is used for displaying a text.
AppCompatEditText is used for entering a text on runtime
AppCompatButton is used for submission
Now register your app info in Strings.xml file
Strings.xml: (app registration info)
<resources>
<string name="app_name">My Application</string>
<string name="entername">Enter Your Name :</string>
</resources>
You can register your displayable text on this.
Note: Activity main and string both files would be automatically called On this main activity file. Now you can start modifying this file as below.
MainActivity.java:
package agira.com.myapplication
//importing packages to use the android features...
import android.os.Build
import android.support.v7.app.AppCompatActivity
import android.os.Bundle
import android.speech.tts.TextToSpeech
import android.support.annotation.RequiresApi
import android.support.v7.widget.AppCompatButton
import android.support.v7.widget.AppCompatEditText
import android.util.Log
import kotlinx.android.synthetic.main.activity_main.*
import java.util.*
class MainActivity : AppCompatActivity(),TextToSpeech.OnInitListener {
//Id Declaration
    private var valuee:AppCompatEditText?=null;
private var submitdata:AppCompatButton?=null;
private var voicespeech:TextToSpeech?=null;
@RequiresApi(Build.VERSION_CODES.LOLLIPOP)
override fun onCreate(savedInstanceState: Bundle?) {
super.onCreate(savedInstanceState)
setContentView(R.layout.activity_main)
//oncreate functionalities
valuee=this.name;
submitdata=this.submit;
voicespeech= TextToSpeech(this,this);
submitdata!!.setOnClickListener{
speakout()
}
}
@RequiresApi(Build.VERSION_CODES.LOLLIPOP)
//function to run the welcome voice
private fun speakout(){
val text = valuee!!.text.toString()
voicespeech!!.speak("welcome to kotlin"+text, TextToSpeech.QUEUE_FLUSH, null,"")
}
//this function is used for the initializing the text to speech feature
override fun onInit(status: Int) {
if (status == TextToSpeech.SUCCESS) {
// set US English as language for voicespeech
val result = voicespeech!!.setLanguage(Locale.US)
if (result == TextToSpeech.LANG_MISSING_DATA || result == TextToSpeech.LANG_NOT_SUPPORTED) {
} else {
submitdata!!.isEnabled = true
}
} else {
Log.e("voicespeech", "Initilization Failed!")
}
}
public override fun onDestroy() {
if (voicespeech != null) {
voicespeech!!.stop()
voicespeech!!.shutdown()
}
super.onDestroy()
}
}
And if you are too confused to see what is happening in the above codes here is the brief explanation for each division.
import android.os.Build
import android.support.v7.app.AppCompatActivity
import android.os.Bundle
import android.speech.tts.TextToSpeech
import android.support.annotation.RequiresApi
import android.support.v7.widget.AppCompatButton
import android.support.v7.widget.AppCompatEditText
import android.util.Log
import kotlinx.android.synthetic.main.activity_main.*
import java.util.*
These are the imported packages that are pre-built codes. We can use this features by just importing those packages
class MainActivity : AppCompatActivity(),TextToSpeech.OnInitListener
On this above line, the mainactivity extends the appcompatactivity module to text to speech listener.
override fun onCreate(savedInstanceState: Bundle?) {
super.onCreate(savedInstanceState)
setContentView(R.layout.activity_main)
//oncreate functionalities
valuee=this.name;
submitdata=this.submit;
voicespeech= TextToSpeech(this,this);
submitdata!!.setOnClickListener{
speakout()
}
}
It’s a core part of every android activity. Every android activity will run the “oncreate” functions first so here we had given the variable declarations with submit button actions, text to speech and click listener.
override fun onInit(status: Int) {
if (status == TextToSpeech.SUCCESS) {
// set US English as language for voicespeech
val result = voicespeech!!.setLanguage(Locale.US)
if (result == TextToSpeech.LANG_MISSING_DATA || result == TextToSpeech.LANG_NOT_SUPPORTED) {
} else {
submitdata!!.isEnabled = true
}
} else {
Log.e("voicespeech", "Initilization Failed!")
}
}
Above lines are another main function used to start initializing the text to speech conversion process.
public override fun onDestroy() {
if (voicespeech != null) {
voicespeech!!.stop()
voicespeech!!.shutdown()
}
super.onDestroy()
}
This function used to stop, shutdown and to run automatically when the application got closed.
Once everything is done start executing your program, you can see the below output screen where you can enter your name and submit. Finally, it will welcome you by playing the voice message.
Output:
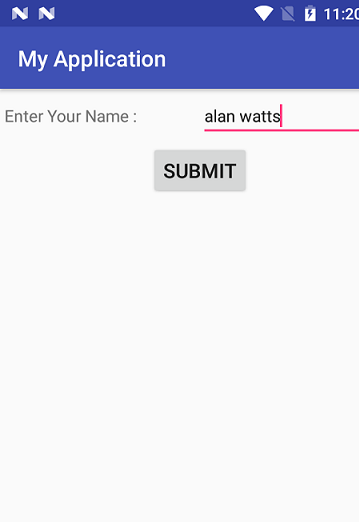
It’s done! Start typing your name and submit and there you will be welcomed by the voice message.
Hope this article about Kotlin in Android Development would have helped you to start building your Kotlin program on your own. Now you can play with your coding and develop whatever you are trying to bring out!
New technologies are never new to us! We at Agira technologies always staying open to new technologies to bring new visionaries to your apps and we are practiced in such a way to make a difference in whatever we do and if you are looking for developing an app with well-optimized features you can always reach us at www.agiratech.com